
Notifications
Clear all

Hey everyone,
I thought I'd do a focused write-up on the boot disk — what it actually is, why you need one, and the simplest modern ways to create a working one without fighting ancient copy protection or doing ten disk swaps.
What is a GEOS Boot Disk?
The boot disk is the one that actually starts GEOS.
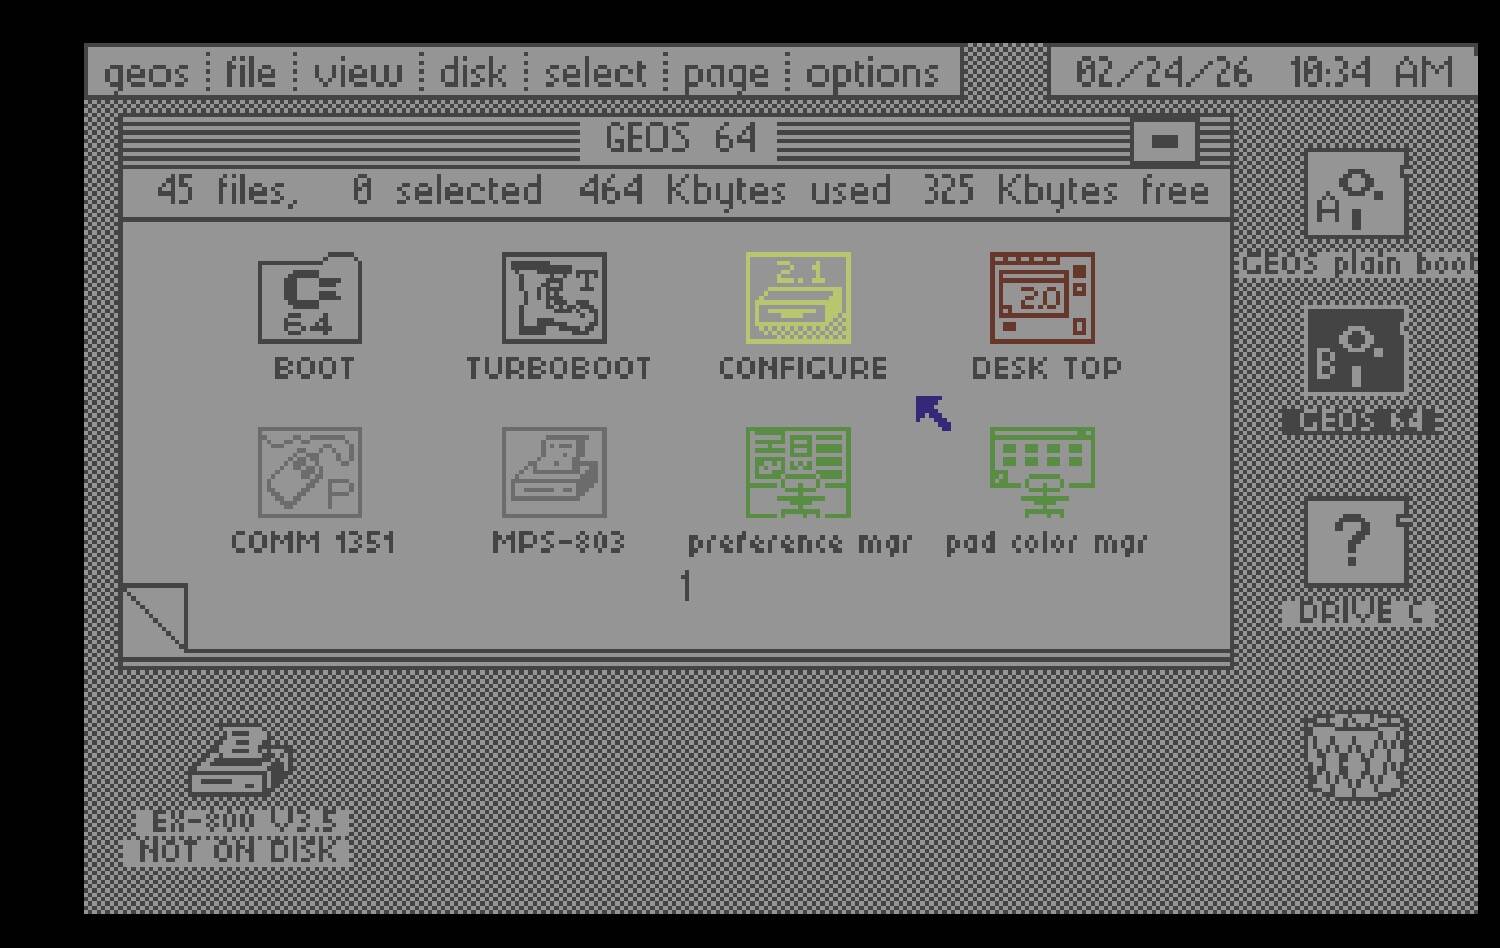
It contains a small set of critical files that load the operating system kernel, the graphical deskTop interface, and the CONFIGURE app (for setting up drives, RAM expansion, mouse/joystick, etc.).
Typical minimum files on a classic GEOS 64 boot disk (1541 format):
- GEOS (the boot loader program)
- GEOBoot (or GEOBOOT.PRG — starts the actual loading sequence)
- DESK TOP (the main GUI program)
- CONFIGURE (lets you define drive A/B/C, RAM disk, etc.)
When you do
LOAD"GEOS",8,1
(or just GEOS with JiffyDOS/fast loader), it runs GEOBOOT → loads the kernel → launches deskTop.
After that first boot you usually eject the boot disk and work from other disks (work disks, app disks, RAM disk if you have REU/GEORAM/etc.).
Important: The original 2.0 boot disks are copy-protected and 1541-only (170 KB). They often refuse to boot on misaligned drives, slow loaders, or after too many copies. That's why most people today use clean boot images from the community.
Easiest Ways to Make a Boot Disk Today
Here are (in my opinion) the most painless methods ranked roughly easiest → more advanced:
1. Use a pre-made .d64 boot image (by far the easiest – recommended for 90% of people)
- Go to Boot Disks
- Grab one of the ready-to-use boot archives
- Transfer the .d64 to real hardware using:
→ 1541 Ultimate-II / Ultimate-II+ (easiest)
→ Pi1541
→ SD2IEC (with good firmware)
→ ZoomFloppy + real 1541/1571/1581
- Mount the .d64, type LOAD"GEOS",8,1 (or just GEOS with fast loader) → it should say "BOOTING GEOS..." and go straight to deskTop.
- Many modern images already have diskTurbo, 1571/1581 support, and REU drivers baked in.
2. Make your own from a downloaded boot package
- Download a boot archive from cbmfiles.com/geos (e.g. the GEOS64 boot files)
- Use DirMaster (on PC) or GEOS itself (once running) to put the files onto a freshly formatted .d64 / real disk
- Key files again: GEOS.PRG, GEOBOOT.PRG, CONFIGURE.USR, DESK TOP.USR
- Boot with LOAD"GEOS",8,1
- Run CONFIGURE from deskTop to set your drives/RAM/mouse → save config to the boot disk
3. If you already have GEOS running and want another boot disk (on any drive type)
- Use community tools like:
- geoMakeBoot (makes a 2.0-style boot disk on almost any drive)
- GEOS1581 (great for turning a boot disk into 1581/1.6 MB format)
- Wheels / gateWay / MP3 upgrades (they include boot-disk makers that support HD drives, partitions, etc.)
- These are floating around on zimmers.net, CSDb, or Lemon64 file servers.
One key note on upgrades:
To install or upgrade to modern GEOS variants like Wheels (64/128), MegaPatch 3 (MP3), or the newer GDOS64 (the evolving C64 powerhouse from Markus Kanet), you almost always need a working GEOS 2.0 environment first. That means booting from a functional boot disk (or running base GEOS) to launch the installer/updater on the upgrade disk. The installers patch/replace files in your existing setup—they don't create a from-scratch OS. So get a solid boot disk going before chasing those big upgrades!
The Reality: Finding GEOS Disks/Programs That "Just Work"
One big frustration for newcomers (and even some veterans) is how hard it can be to find GEOS boot disks, apps, or full system disks that boot and run reliably without extra hassle. Many archives floating around are in .cvt (Convert) or .lnx (Lynx/Packed) formats instead of plain .d64 disk images.
Quick explanation:
- .cvt files are single GEOS files (like a geoWrite document or desk accessory) converted to standard Commodore SEQ/PRG format for easy internet transfer (original GEOS had its own internal structure with info blocks that don't play nice with normal file systems). You need the Convert tool inside GEOS (or equivalents like geoPack or modern cross-platform tools) to turn them back into usable GEOS files on a disk.
- .lnx files are archives packing multiple converted GEOS files together (like a zip for GEOS stuff). You unpack them with Lynx tools or geoPack, then convert each one individually.
For casual users, this gets complicated fast: You need GEOS already running to use the native converters, or fiddle with PC tools (DirMaster, cbmconvert, etc.) that might require command-line knowledge, specific versions, or trial-and-error. Mismatched tools can corrupt files, leave them unusable, or break GEOS-specific metadata. It's a chain of steps that feels overwhelming if you're just trying to boot deskTop and play around.
That's why sticking to pre-made .d64 boot images (or full system .d64s when available) is a lifesaver—they're ready-to-mount, no conversion needed, and modern ones are patched for reliability on real hardware/emulators/fast loaders. Search for "GEOS 64 boot d64" or check trusted spots like cbmfiles.com/geos, zimmers.net/pub/cbm/geos, or recent Lemon64/CSDb uploads. Avoid random old archives unless they specify "ready-to-use .d64" or include clear instructions.
Quick tips once you have a boot disk:
- Make a backup copy right away (use Disk Copy from within GEOS or whole-disk copy on PC).
- Never put important apps/documents on the boot disk — keep it minimal so it boots fast and reliably.
- If you have REU/GEORAM/1541U RAM, copy deskTop + drivers to RAM disk early to minimize swapping.
- For fastest boot: JiffyDOS + diskTurbo + REU is magic. Many modern boot images already include these.
Happy GEOS-ing!
-Sutehk
Topic starter
Posted : 24/02/2026 1:20 pm

Great post and THANK YOU!
This just explains quick and simple how to get going and well inspires one to just grab a 2.0 disk and start jumping in to picking a version of GEOS to play and work on!
Commodore 64 BBS -=[ commodore64bbs.com:6464 ]=- ....1st Commodore 64 Ultimate to run Image BBS 3.0!
The Kats Alley BBS -=[ tka.8bitboyz.com:6400 ]=- ....Running Image 3.0 for the C64
8-Bit Boyz BBS -=[ bbs.8bitboyz.com:6502 ]=- ....Running Mystic on Windows
Best Retro Web Resource -=[ www.8bitboyz.com ]=- ....Running a whole lotta PHP, Javascript, SQL and so much more!
Posted : 24/02/2026 3:19 pm

What It Is + Easiest Ways to Make One
Have you tried the gMakeBoot Update disks from here? 😉
gMakeBoot itself is a fork of CMDs MakeBoot and the disk images in the "update" directory include everything "new" needed to create a new bootable GEOS disk.
* boot from your original GEOS64 2.0 boot disk
* Insert the update disk that matches your language and RAM type (REU or GeoRAM supported, the "r" indicates the GeoRAM version).
* Run "gMakeBoot"
Done... the new boot disk now includes the latest version of "CONFIGURE" (geosconf64), the latest version of "DESK TOP" and a few support utilities for SD2IEC and some more "goodies" (like set date and time during boot for TC64, WiC64 and Ultimate devices).
Ultimate users might want to try the "U64" input devices, but you must set the correct "Turbo control" settings in the ultimate menu when using the turbo mode.
Markus
Posted : 07/03/2026 12:41 am
Sutehk reacted